All our life we keep looking for easier alternatives and shortcuts no matter what we are into. Photoshop provides us with lots of such options.
Today I'm going to share some of my favorite photoshop shortcuts and tricks, which can make your designing way too fast and easy.
1> See the Change
When working with type, in order to see the text color you are setting, after selecting the text, click on the colour square in options bar. This way while setting the new color, the text does not remain highlighted and changes can be monitored easily.

2> Easy and Fine Selection
The real pain for any ammature photoshop user is fine selection. Though Photoshop contains some most powerful and easy-to-use selections tools, still selection can be a little tricky.
The magnetic pen is a great tool for that purpose, especially for simple objects with contrast background.
Select the Freeform pen and click the arrow new to the Custom Shape icon. In the Freeform Pen Options window, click the magnetic checkbox.

3> Right use of you PS eye
This is a very simple yet very useful option while working on multiple layers. If you want to observe the changes or objects behind a certain layer, just click on a 'Eye' on the left of the layer name and see the difference.

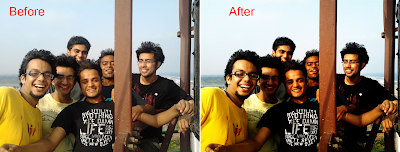
4> Easy Photo Editing
The most simple and easy way to darken and increase the color of an image is to duplicate the image layer. Select the upper layer and apply "Color Burn" as the blending mode.
You can also change the opacity of the upper layer to refine your effect.

5> No Palette Disturbance
When you are into some serious photo editing and there are lots of palettes open in the course, there may be a possibility that these palettes are hindering your view. To monitor the image and hide the palettes press 'TAB'.
Press 'TAB' again to bring the palettes back.

6> Easy Trick to Find Center
The most easy way to find an image's center is by using 'Free Transform'. Keyboard shortcut 'ctrl+T'. A box appears at the edges with a pointer at the center.
You can mark the center location by using Ruler. (View > Ruler , or 'Ctrl+R')

7> Transform and Copy
Sometimes we may need to use an object more than once in our psd, say the same image at different sizes and shapes. Use 'Ctrl + Alt + T'. This works same as the normal Free Transform with the basic difference that the parent layer remains untouched and all the changes you made are stored in a different layer above that.

8> Power of Curve and Level
The Curve and Level options can prove of great help when editing an image, say your profile pic for a social networking site.
Just experiment with 'Ctrl + M' and 'Ctrl + L' i.e. Curve and Level respectively.
9> Clone my Way
The Clone tool has always been on my favorite tools list. The best part of Clone tool is you can not only use it on a same image but can also clone areas from on all together different image.
Select the clone tool, go to the image from where you want to pick the cloning, use 'Alt + left-click' for this purpose. Now get back to your main image and start stamping your clone from an altogether different source.

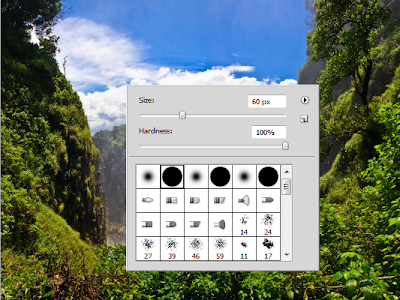
10> Shortcut to Brush Picker
When working with brushes, its painful to go back to the side palette and select the brush customs. There's an easy shortcut for this purpose.
Press 'Right click' on your mouse and the Brush Picker appears.
11> From Text to Layer
The easiest way to convert a text layer to a shape layer is, Layer > Type > Convert to Shape

12> Undo your Mistakes
Undo a very important option when it comes to photoshop. In order to undo your mistakes more than once, press 'Ctrl + Alt + Z'.
 13> Easy Duplicating
Sometimes we need to use the duplicate layer options a lot. This can be a very tedious task, depending on the number of duplication. A simple solution to this is: Select Move > In control options set 'Auto-Select: Layer' > Now click on the layer to be duplicated, hold 'Alt + Left-Click' and drag to new position to create a duplicate layer.

14> Create a Super Quality Panorama
Does your camera quality automatically degrades on panorama mode? No problem! Just take the images in normal camera mode such that each frame captures a distinct shot. Now follow this:
File > Automate > Photomerge...
Browse and enter the images, experiment with different options and get a High Definition Panorama image, just in a click!

15> Read Composite Data
A psd document with lots of layers in it, can take a long time to load up. In order to save time and CPU resources while just viewing the document, follow these steps.
File > Open > 'Shift + Alt + Enter' on the selected file, you wanted to open.
The file will open in flattened mode, while the layers remain intact with the parent document.

16> Photo Filters
Photo Filter option can prove useful when editing an image, say landscape. With some preset filters life warming filter, cooling filter etc., quick effects can easily be given to any image.
Image > Adjustments > Photo Filters...

17> Quick Fixing Overexposed Images
A common problem with images clicked on normal digicam is that the images are overexposed and hence lacks the highlight details, also important bright parts of an image are "washed out" or effectively all white, know as "blown out highlights".
Blending modes can be used effectively for fixing this.
Duplicate the layer > Select the Top layer and set "Multiply" as blending mode.
Opacity of the top layer can be adjusted accordingly to get the best possible satisfaction.

18> Easy Vector Effect
Still have problems with Pen tools? Want a vector effect for your image? Don't worry, here's your savior:
Filter > Artistic > Cutout...
Though it does not create a real vector, yet the effect can efficiently be obtained.

19> Shortcuts Cheat-Sheet:

20> Blending Modes Cheat-Sheet:

Today I'm going to share some of my favorite photoshop shortcuts and tricks, which can make your designing way too fast and easy.
1> See the Change
When working with type, in order to see the text color you are setting, after selecting the text, click on the colour square in options bar. This way while setting the new color, the text does not remain highlighted and changes can be monitored easily.

2> Easy and Fine Selection
The real pain for any ammature photoshop user is fine selection. Though Photoshop contains some most powerful and easy-to-use selections tools, still selection can be a little tricky.
The magnetic pen is a great tool for that purpose, especially for simple objects with contrast background.
Select the Freeform pen and click the arrow new to the Custom Shape icon. In the Freeform Pen Options window, click the magnetic checkbox.

3> Right use of you PS eye
This is a very simple yet very useful option while working on multiple layers. If you want to observe the changes or objects behind a certain layer, just click on a 'Eye' on the left of the layer name and see the difference.

4> Easy Photo Editing
The most simple and easy way to darken and increase the color of an image is to duplicate the image layer. Select the upper layer and apply "Color Burn" as the blending mode.
You can also change the opacity of the upper layer to refine your effect.

5> No Palette Disturbance
When you are into some serious photo editing and there are lots of palettes open in the course, there may be a possibility that these palettes are hindering your view. To monitor the image and hide the palettes press 'TAB'.
Press 'TAB' again to bring the palettes back.

6> Easy Trick to Find Center
The most easy way to find an image's center is by using 'Free Transform'. Keyboard shortcut 'ctrl+T'. A box appears at the edges with a pointer at the center.
You can mark the center location by using Ruler. (View > Ruler , or 'Ctrl+R')

7> Transform and Copy
Sometimes we may need to use an object more than once in our psd, say the same image at different sizes and shapes. Use 'Ctrl + Alt + T'. This works same as the normal Free Transform with the basic difference that the parent layer remains untouched and all the changes you made are stored in a different layer above that.

8> Power of Curve and Level
The Curve and Level options can prove of great help when editing an image, say your profile pic for a social networking site.
Just experiment with 'Ctrl + M' and 'Ctrl + L' i.e. Curve and Level respectively.

9> Clone my Way
The Clone tool has always been on my favorite tools list. The best part of Clone tool is you can not only use it on a same image but can also clone areas from on all together different image.
Select the clone tool, go to the image from where you want to pick the cloning, use 'Alt + left-click' for this purpose. Now get back to your main image and start stamping your clone from an altogether different source.

10> Shortcut to Brush Picker
When working with brushes, its painful to go back to the side palette and select the brush customs. There's an easy shortcut for this purpose.
Press 'Right click' on your mouse and the Brush Picker appears.

11> From Text to Layer
The easiest way to convert a text layer to a shape layer is, Layer > Type > Convert to Shape

12> Undo your Mistakes
Undo a very important option when it comes to photoshop. In order to undo your mistakes more than once, press 'Ctrl + Alt + Z'.

Sometimes we need to use the duplicate layer options a lot. This can be a very tedious task, depending on the number of duplication. A simple solution to this is: Select Move > In control options set 'Auto-Select: Layer' > Now click on the layer to be duplicated, hold 'Alt + Left-Click' and drag to new position to create a duplicate layer.

14> Create a Super Quality Panorama
Does your camera quality automatically degrades on panorama mode? No problem! Just take the images in normal camera mode such that each frame captures a distinct shot. Now follow this:
File > Automate > Photomerge...
Browse and enter the images, experiment with different options and get a High Definition Panorama image, just in a click!

15> Read Composite Data
A psd document with lots of layers in it, can take a long time to load up. In order to save time and CPU resources while just viewing the document, follow these steps.
File > Open > 'Shift + Alt + Enter' on the selected file, you wanted to open.
The file will open in flattened mode, while the layers remain intact with the parent document.

16> Photo Filters
Photo Filter option can prove useful when editing an image, say landscape. With some preset filters life warming filter, cooling filter etc., quick effects can easily be given to any image.
Image > Adjustments > Photo Filters...

17> Quick Fixing Overexposed Images
A common problem with images clicked on normal digicam is that the images are overexposed and hence lacks the highlight details, also important bright parts of an image are "washed out" or effectively all white, know as "blown out highlights".
Blending modes can be used effectively for fixing this.
Duplicate the layer > Select the Top layer and set "Multiply" as blending mode.
Opacity of the top layer can be adjusted accordingly to get the best possible satisfaction.

18> Easy Vector Effect
Still have problems with Pen tools? Want a vector effect for your image? Don't worry, here's your savior:
Filter > Artistic > Cutout...
Though it does not create a real vector, yet the effect can efficiently be obtained.

19> Shortcuts Cheat-Sheet:

20> Blending Modes Cheat-Sheet:

Comments
Post a Comment